Over the last 2 weeks, I have taken the opportunity to remodel my studio/game room. Thanks to this process I have been able to reclaim a ton of space to work in and feel a heck of a lot less cramped. One of the final phases of this redesign is to wall mount as many of my consoles as I can to eliminate the need for the tower of doom I still have over in the corner. I went for function over prettiness since I plan to disassemble a portion of it in the coming weeks, don’t judge. I am starting with Microsoft’s latest and greatest, the Xbox Series X, and our new friends at Alienergy have supplied me with one of their new Advanced wall mounts to try out. Not only does it accomplish the task of attaching my Xbox to the wall, but there are also a few perks I managed to squeeze out of the device that has made me exceptionally happy!
What’s In The Box
The Alienergy wall mounts come in 2 flavors: Basic or Advanced. The mounts come in a standard brown box with only a single label denoting which version is inside. Inside the packaging of the Advanced version, you will find the basic mount plate for the Xbox, an advanced mount plate to allow forward-facing operation, a controller mount, a set of screws and other installation hardware, and finally an installation manual.
Aesthetics And Build Quality

The Alienergy mounts are constructed with steel and feature a powder-coated finish giving them a strong yet sleek build. The first thing I noticed as I began setting up the mount was how it leaves every ventilation port the Xbox has open. Ventilation is huge for these new consoles so any blockage would have been an instant no for me. You also gotta love the huge X on the base of the mount! Since this part of the mounting kit is essentially the Basic mount, you will find a number of holes in the back of the plate that can be used to either attach it to a wall or the advanced mounting plate. This second plate shares the same sturdy design as the first complete with another large X. There is about 2 inches worth of space inside this plate which gives it ample room to use any of the Xbox’s rear ports and route cords with ease. I am taking advantage of this space for a whole other purpose as you will see in a moment! A series of holes for mounting are again found along the back of the plate.
Installation
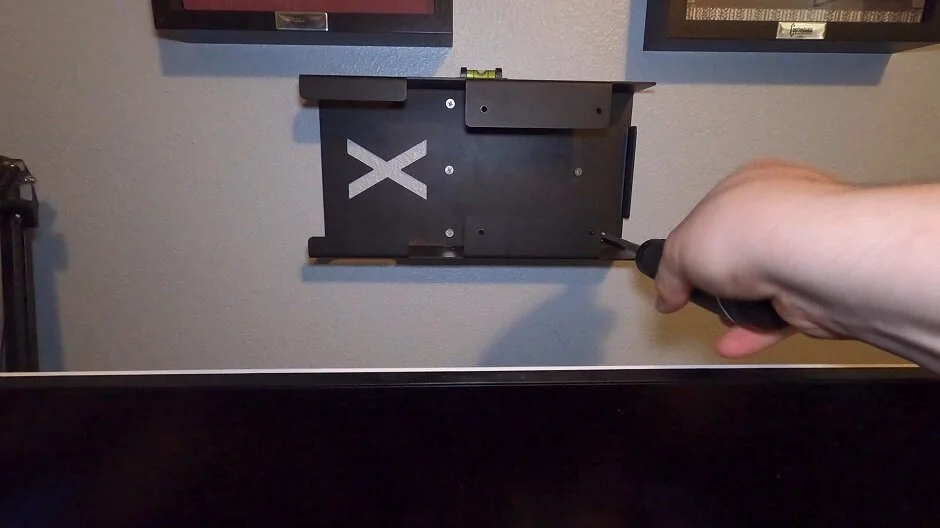
Installing the Advanced mount is pretty simple; find the location you want it to be placed, ensure the plate is level using the included level, and then mark the location of the six mounting holes. From here drill a couple of pilot holes and screw the mount in with the included drywall screws. A number of drywall anchors have been included as well for added security. I choose to leave them out since I made sure to hit a stud along one of my screw lines. With the advanced plate in place, it is just 4 more screws to attach the basic plate to it. Then it is quick and easy to route all of my cables up through the bottom of the advanced plate to attach them to the Xbox. Before sliding the Xbox into place, be sure to apply the 4 included soft pads to the rails of the mount as to not scratch up your console!
Now as I am sure you noticed, I elected to mount my console horizontally and there was a very specific reason for this. I can utilize the space in the advanced mounting plate to store my external hard drives! I am able to fit both my Seagate 8TB and a 1TB external SSD in this space without blocking any of the ports on the back of the Xbox. I also have USB receivers attached to the Seagates hub giving me mouse and keyboard control in supported titles! While I think the Xbox looks better standing vertically, the mount hides the awkward base stand well enough to make this position a bit more appealing. I can also use the space on top to house a few Xbox-related goodies! Thanks to the dock’s design it is also quite easy to pull the console out when needed.

Even with everything packed in, the ventilation while using the Alienergy Advanced dock is top-notch. I have spent the last week with it in the mount on my shelf just to be sure it would be ok before mounting. While I don’t have any measurement tools to give exact numbers, I have constantly felt the exhaust of the Series X during different tasks from gaming and emulation to watching videos. Between sitting on a shelf and being mounted the difference is negligible to me. I will let you all know the exact numbers when I get the proper equipment to do so!
What It Could Have Done Better

While the Alienergy dock does a great job with its intended purpose, there are a few things to note about its design. The Advance dock will stick out from the wall quite a ways, so keep that in mind when choosing your mounting location. If you decide to mount your Xbox horizontally like I have, you will have no way to attach the controller mount in a usable fashion. I think this might be my one and only actual criticism of the dock as a whole. Thankfully if you really want to use the controller mount it has its own docking holes for you to use to do so!
Verdict
At the end of the day, it took less than 10 minutes to get my Xbox Series X off of my desk and into a nice position above my monitor with external hard drives included. The dock holds the Xbox Series X in place very well and the added benefit of horizontal mode looking a bit less weird is definitely a bonus. The asking price of $44.99 is a bit of a turn-off at first for sure, but the strong steel frame certainly justifies it. If you are looking for a way to save some shelf space and consolidate your Xbox Series X setup into a single sleek-looking package the Alienergy Advanced dock has you covered!