Stuck at 90 ping in ranked Valorant matches, losing gunfights that should have been easy wins? That frustration is familiar to anyone who has fired first, had the better angle, and still died on the killcam. That kind of loss stings differently, because it is not a skill problem. It is a connection problem.
That frustration is what pushed me to try Smart Game Booster, a PC and network optimization tool from iTop Inc. I ran it for two weeks across my regular Valorant and PUBG sessions, and I tracked the numbers instead of just trusting my gut. This review covers what I found when I looked into how to reduce ping in Valorant, how to boost FPS on PC, and how to stop random frame drops mid-match, along with the exact steps I followed and the results I measured.
Why Your FPS Drops and Ping Spikes During Gaming
Before I tested any tool, I wanted to understand what was actually causing my drops. A few culprits kept showing up.
Background apps quietly eat your CPU and RAM while you play, even when you think your desktop is clean.
Outdated GPU or network drivers slow your connection without any obvious warning sign.
Regional server distance adds real milliseconds no matter how fast your internet plan is.
Peak hour congestion hits hard when everyone nearby is streaming or gaming at the same time you are.
Once I saw that pattern, I went looking for a tool built to address all four causes at once instead of patching just one.
How to Boost FPS and Reduce Ping With Smart Game Booster
Smart Game Booster by iTop Inc. combines PC optimization, hardware boosting, network acceleration, hardware monitoring, and security tools in one Windows application. Designed as an effective FPS Booster, it brings everything together instead of relying on multiple utilities to help improve gaming performance, reduce latency, and keep your system running smoothly. Here is what each core feature does, followed by the exact steps I used to set it up.
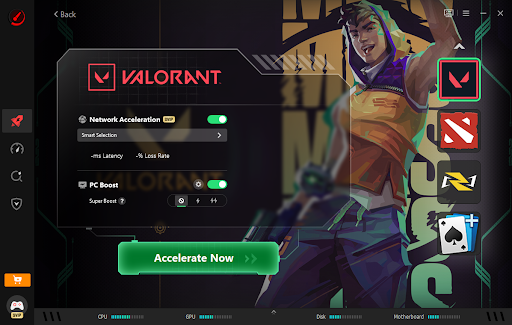
Network Acceleration connects you through 500+ game servers worldwide, cutting the distance your data travels before it reaches the game server.
Super Boost overclocks your GPU and VRAM, with a claimed performance improvement of up to 30% on supported hardware.
Auto Boost detects the moment you launch a game and switches your PC into gaming mode automatically.
Real-Time Monitor tracks hardware temperature and resource usage in real time. The on-screen monitor helped me keep an eye on system performance during longer gaming sessions.
The Performance section also includes System Clean, System Tweak, Driver Update, and Game Defrag. Together, these tools help keep Windows optimized by removing unnecessary files, updating drivers, fine-tuning system settings, and improving game loading performance.
The current build I tested, version 6, is a Windows-only tool that runs on Windows 11, Windows 10, Windows 8.1, Windows 8, and Windows 7.
My Smart Game Booster Setup Process
Here is the setup process I followed, step by step.
Step 1: Download and install.
I grabbed the installer from the official Smart Game Booster download page. At 88 MB, it took under two minutes on a normal connection, and the install itself did not ask me to change any advanced settings.
Step 2: Let it scan your games
On first launch, the app scanned my PC for installed games. I selected Valorant first, then repeated the process with PUBG before moving on to the optimization settings.
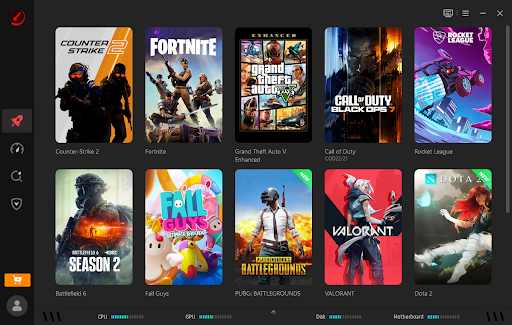
Step 3: Turn on Network Acceleration
Switched to the Network tab and enabled Network Acceleration. The feature uses a network of more than 500 game servers worldwide to help reduce latency, packet loss, and peak-hour congestion while improving cross-region connectivity.
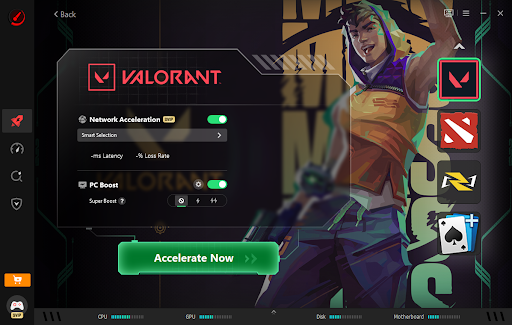
Step 4: Enable Super Boost
I turned this on from the same panel and kept the Real-Time Monitor open in the background so I could watch temperatures while the overclock was active.
Step 5: Click Accelerate Now
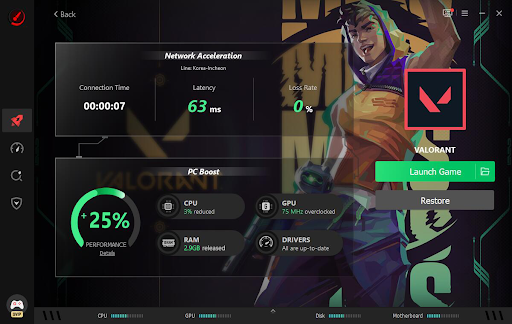
I gave it two or three matches before judging any result, since the first session sometimes takes a moment to fully settle into the new profile. Once this setting was confirmed, there was no need to open the app manually before every session. The game was detected automatically, and the boost was applied without any extra steps.
Real Results After Two Weeks
I ran the same Valorant and PUBG sessions before and after enabling Smart Game Booster at roughly the same time of day to keep the comparison fair. In Valorant, I noticed more stable latency during competitive matches after enabling Network Acceleration.
PUBG also felt smoother during larger firefights, with fewer noticeable frame drops once the performance optimization features were enabled. While the exact results will vary depending on your hardware, internet connection, and server location, the overall gaming experience felt more consistent throughout my testing.
That gap matters more than it sounds. Latency research on competitive shooters has shown that cutting network delay by around 100 milliseconds can noticeably improve accuracy and add extra eliminations per minute in fast-paced matches.
Although every gaming setup is different, the improvements were noticeable enough that lag became less distracting during competitive matches. I found myself focusing more on gameplay instead of worrying about unexpected frame drops or connection spikes.
Pros and Cons
After testing, here are the biggest strengths and limitations I found.
What worked well:
Ping dropped noticeably during peak hours once Network Acceleration kicked in.
Auto Boost removed my old habit of manually closing background apps before every match.
Real-Time Monitor caught a temperature spike I would have otherwise missed.
Where it falls short:
Super Boost's 30% claim depends heavily on your hardware. My own gains landed closer to 18%.
Certain advanced settings are locked behind a paid tier.
Frequently Asked Questions About Smart Game Booster
Does Smart Game Booster actually increase FPS?
Yes, based on my testing. The exact gain depends on your GPU and the game you are running.
Does it work with any internet connection?
It performs best on a connection with decent bandwidth already in place. Network Acceleration cuts latency, but it cannot repair a fundamentally unstable line.
What are the system requirements?
Smart Game Booster runs on Windows 11, Windows 10, Windows 8.1, Windows 8, and Windows 7, with an install size of about 88 MB.
Conclusion
After using Smart Game Booster for two weeks across Valorant and PUBG, I found it to be an easy way to optimize my gaming setup without spending time on manual Windows tweaks before every session. Features like Network Acceleration, Auto Boost, Super Boost, Real-Time Monitor, and the built-in Performance tools helped create a smoother gaming experience.
Can I Run It and Guard also added useful functionality beyond basic FPS optimization. While the improvements will vary depending on your hardware and internet connection, Game Booster is worth trying if you want an all-in-one gaming optimization tool.