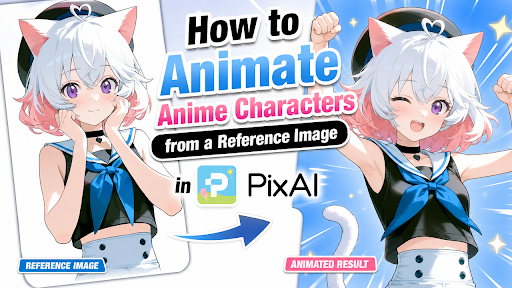
When I first started animating my anime illustrations, I struggled constantly with fragmented workflows. Since most AI anime image generators don’t support videos, I would have to download the file to my desktop and then upload it to a completely separate video platform.
PixAI solves this problem by building a dedicated image-to-video engine right into its main creation panel. To animate anime character from image, all you need to do is click a single button on the same screen where you just generated the character, and the platform adds your image to the animation queue.
And the best part is that the platform’s video tool supports reference images, ensuring your hairstyles, eyes, and outfits don’t drift across frames. In this guide, I’ll show you how to select your best image, prep your canvas, and produce stable anime videos that you can be proud of.
Why Use a Reference Image for Anime Animation?
When you want to animate anime character from image, the last thing you need is for your OC to come out looking like a new person. But text prompts alone are honestly pretty terrible at capturing exact visual details.
If your prompt just uses words like long silver hair or black military jacket with gold trim, the AI basically rolls the dice. It guesses what those items should look like and can produce something different in each frame.
A reference image fixes that problem instantly because it gives the video generator something to draw from instead of just a pile of vague words. This is especially important if you want the same character to appear across separate video clips.
Choosing the Right Reference Image
Do not just grab any old illustration and assume it will make a perfect starting point for your animation. Take a few extra minutes to select the ideal file.
Start with your strongest image
You need to pick the absolute best version of your character to represent their core identity. Make sure the hair color, facial layout, clothes, and accessories match how you want your protagonist to look across your future clips.
Don’t use a reference image that has flawed anatomy, so the AI doesn’t mistake warped hands or distorted eyes for permanent character features.
Keep the character clearly visible
AI video generators need to see your character clearly to map their movement boundaries. The image should have a clean background and be rendered from forward-facing angles to showcase face shapes, eye colors, and hairstyles without perspective distortion.
Use a high-quality source image
Image resolution is a massive factor. Using blurry or highly compressed images damages your final video quality. Whenever possible, upload your original raw file rather than a compressed copy downloaded from a social media feed or a group chat app.
Preparing Your Character Before Animation
Successful AI animations rely heavily on what you do before hitting the generate button. Spending a few moments planning your scene eliminates endless trial-and-error and keeps your visual style stable.
Start with a clear goal
Before writing your prompt, decide on the specific action you want to see. Is your character turning their head? Smiling? Walking toward the camera?
Keeping the action simple and focused usually produces smoother, more stable animations than asking the AI to perform several complex movements at once.
Keep prompts focused on motion
One of the most common mistakes many creators make is repeating every detail of the character's appearance, even when using a reference image. A prompt that restates your character features will override your reference and cause identity drift. Focus your text purely on the motion.
Less effective:
Anime girl with long silver hair, blue eyes, black military jacket with gold trim, white gloves, calm expression, standing in a snowy forest while smiling and turning toward the camera.
More effective:
Slowly turns toward the camera and smiles as snow falls.
Separating the appearance from the action makes it a million times easier for the AI to understand what to animate and what to lock in place. PixAI is designed to support this approach so you can focus entirely on animating your character.
How to Animate Anime Characters from a Reference Image in PixAI
Even though the AI handles the rendering heavy lifting, the final video quality depends entirely on your initial setup and how clearly your prompt describes the intended movement.
Here are the steps you should follow to create a short clip using your existing anime creations.
Step 1: Upload Your Reference Image
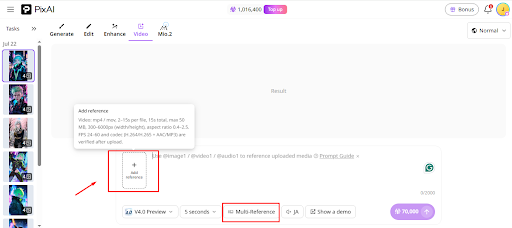
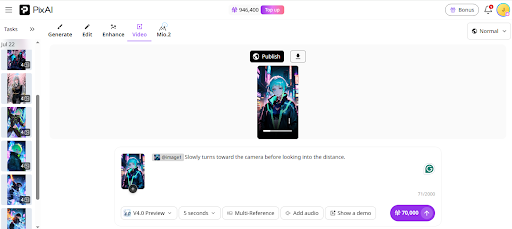
Open PixAI's generation panel and click the Video tab to start creating your clip. But first, you need to ensure you’re using the v4.0 Preview or the PixAI v4.0 Lite Preview image-to-video AI models since they are the only options that support reference images.
Once you’ve selected your model, switch from “First & Last Frames” to “Multi-Reference” and upload your reference image.
Step 2: Describe the Movement
Now that your reference image is locked in, you are ready to write the prompt. The secret trick here is to avoid wasting time listing out hair color or outfits. Instead, you focus on the movements or actions you want to see in your animated clip.
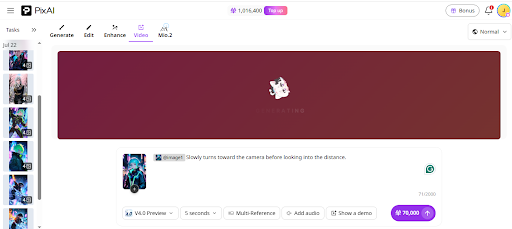
Step 3: Keep the Motion Realistic
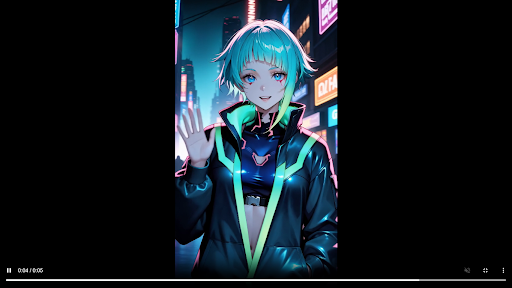
Avoid adding explosive actions in your text prompt. It might not seem so at first, but you’ll get better results by prioritizing natural gestures like blinking, smiling, or a head turn. These focused actions show the AI model exactly where to add motion while preserving the core identity.
But just because simple movements are better, it doesn’t mean you combine tens of them. This will cause your video to look glitchy. Your best bet is to render multiple short clips and edit them together later.
Step 4: Experiment with Camera Movement
Working on your character’s movement is only half the battle. To get the best results, you’ll have to move the camera. Even a subtle, slow zoom or a slight pan gives the frame a more cinematic feel. If you want something less rigid, try a soft handheld effect to add natural energy to the shot.
Common Mistakes to Avoid
Even if you have been creating for years, AI animation can throw some weird roadblocks your way. Dodge these classic slipups to save yourself a ton of wasted hours and endless retries.
Overloading the prompt
Jamming a massive wall of text with pointless character descriptions just completely derails the system from generating the movement you actually want.
The golden rule is to let the reference image handle the appearance and save your prompt text strictly for the action. This will give you a way cleaner clip every single time.
Using a low-quality image
Shoving a blurry or heavily compressed picture into the machine starves the AI model of visual data. If you’re using a downloaded image, make sure you get the crispest high-resolution version available.
Expecting perfect consistency
PixAI’s new v4.0 Preview is certainly one of the best image-to-video generators available today. But it is still far from flawless. Expect small changes in clothing folds, facial features, or stray hair strands when the character moves around a lot. Despite the rapid progress of algorithms, you’ll still need to generate a couple of variations to find the ultimate winner.
Final Thoughts: Animate anime character from image
Reference images offer the best way to keep characters consistent during AI animation. Instead of crossing your fingers and hoping a text prompt gets the outfit right every single time, you hand the engine a solid blueprint that locks down your character’s look.
PixAI brings image creation and video generation under one roof, making it easy and seamless to animate anime character from image. While no AI tool is going to give you flawless frames every single run, PixAI V4.0 Preview’s reference image support gives you total control over your character, allowing you to generate impressive clips.